Category Archives: DIY

DIY Embroidered Bracelet

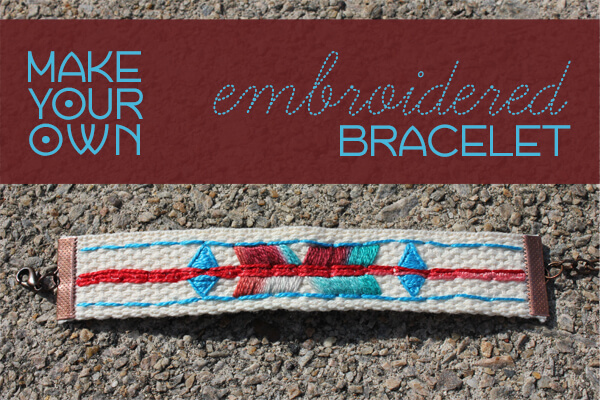
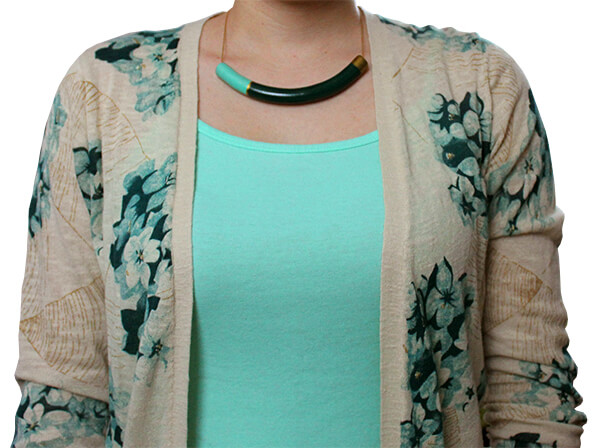
When I was in college, I took a fiber arts class. We learned knitting, crocheting, embroidery, quilting, and we touched on weaving in the final weeks. I really enjoyed the class. It was very relaxed, and I cherish many of the projects I made. I haven’t had much time to use those skills since taking the class, but making an embroidered bracelet was a project I could easily tackle in an afternoon…and I’m quite pleased with the result! It’s a very inexpensive project, and it’s so easy to personalize with different colors and patterns. Keep reading to learn how to make your own!
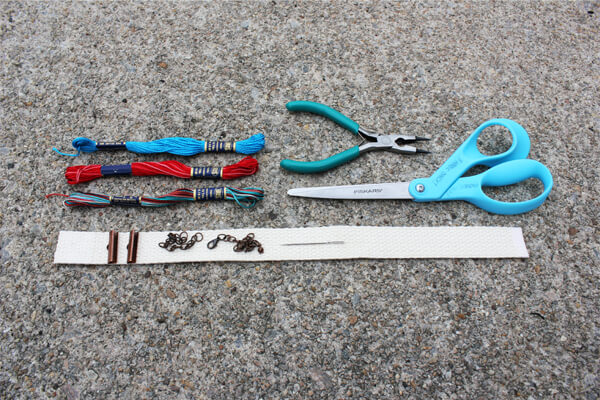
DIY-embroidered-bracelet

SUPPLIES:

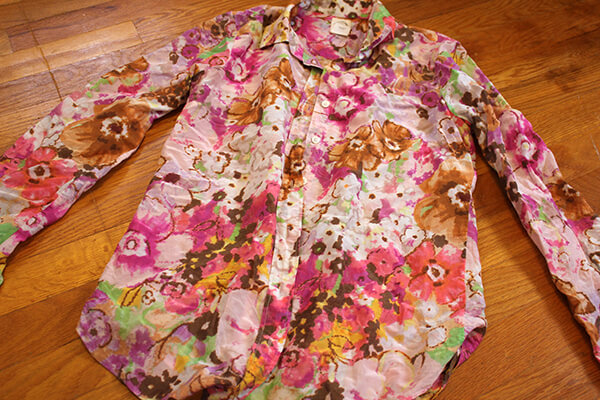
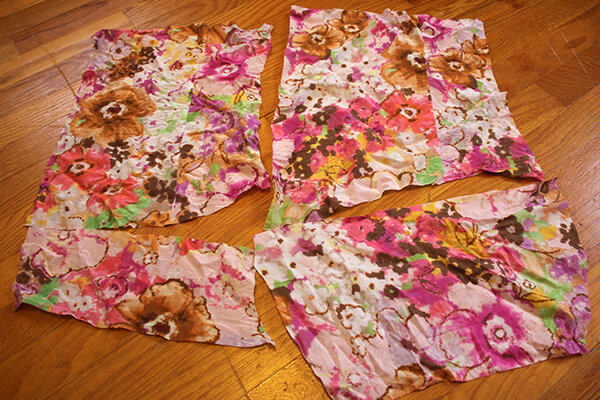
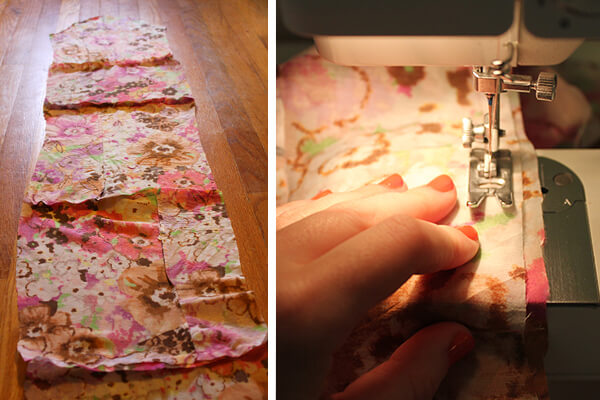
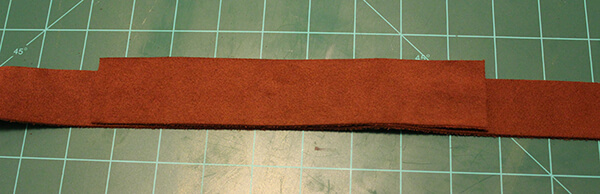
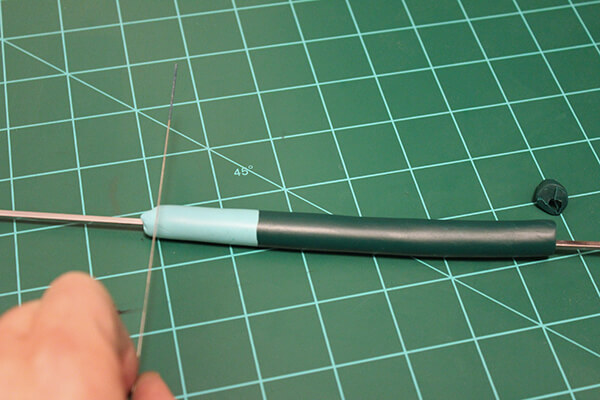
1 inch cotton webbing – My bracelet is 6 3/4 inches, but I got a foot of webbing for only 60¢. You should be able to find this in the sewing department of your craft store.

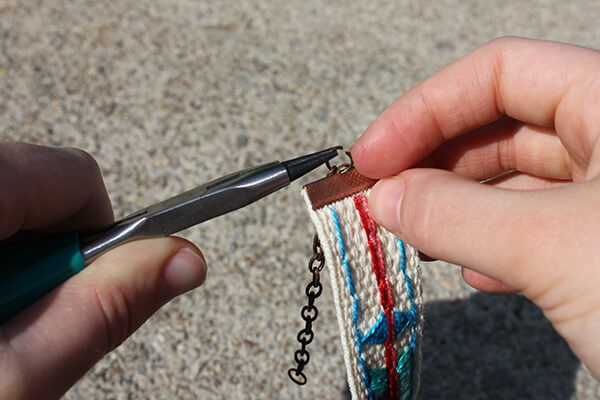
25mm/1 inch ribbon clamps. I couldn’t find these at my craft store, so I got them from this shop on Etsy.

lobster clasp & chain extender

embroidery needle

various colors of embroidery thread

jewelry pliers

scissors

DIY-embroidered-bracelet1

INSTRUCTIONS:

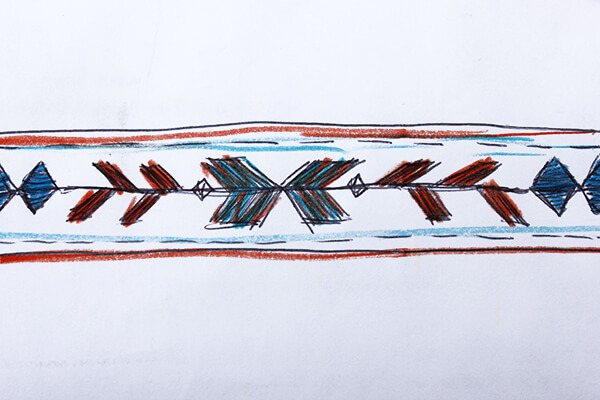
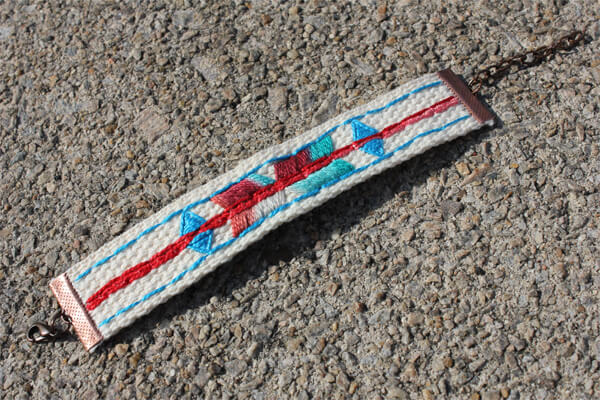
1. Sketch out the pattern you want to embroider…unless you just want to wing it. This is mine, but as you’ll notice, I didn’t follow it exactly. DIY-embroidered-bracelet3

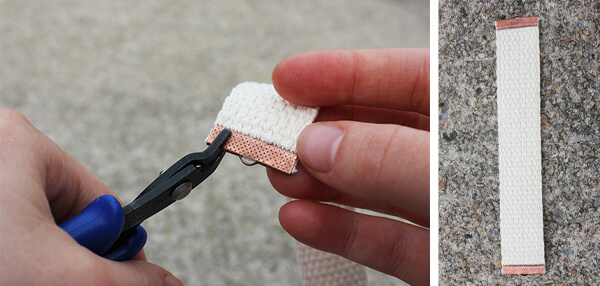
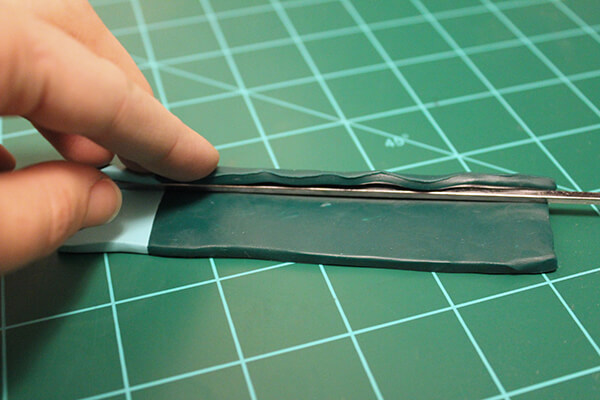
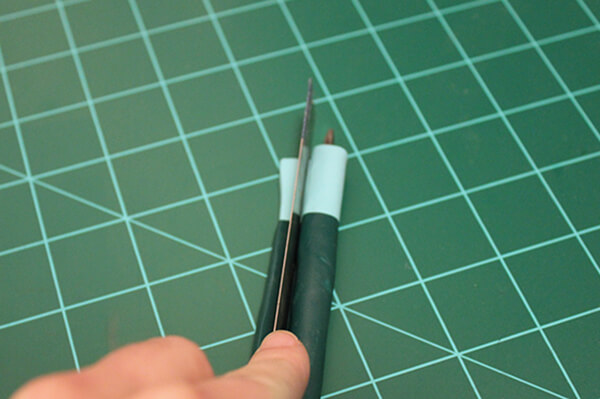
2. Cut your webbing to a length that fits around your wrist. It shouldn’t wrap all the way around your arm since you’re adding a clasp. The ends of mine were about an inch shy of touching when wrapped around my wrist. Put the ribbon clamps on either end of the webbing – you just clamp them on with jewelry pliers. DIY-embroidered-bracelet2

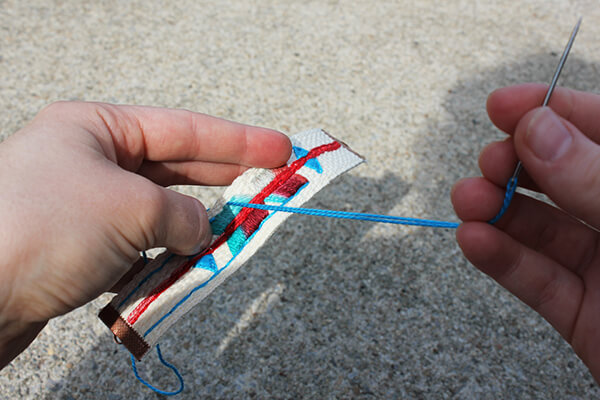
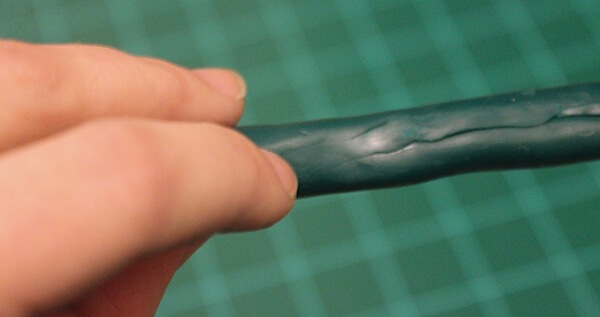
3. Embroider your pattern on the webbing. Don’t worry about it being perfect. Mine’s certainly not, but I still like it. If you need instructions on how to embroider, just check out this instructables article. I just used a basic backstitch and satin stitch, but if you want to get all fancy with french knots and such, go for it! I have some extra webbing, so I may make make another using some different techniques.I went with a southwest-inspired pattern, but something floral or Scandinavian-inspired would be pretty. I also found this picture on Pinterest which has some fun ideas for stitches. DIY-embroidered-bracelet4

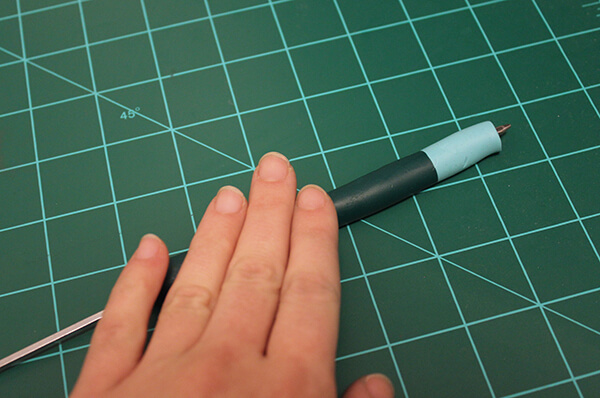
4. Add a chain extender to one end of your bracelet and a lobster clasp to the other. That’s it, you’re done! I’d love to see pictures if anyone does this project, so please share! DIY-embroidered-bracelet5 DIY-embroidered-bracelet6

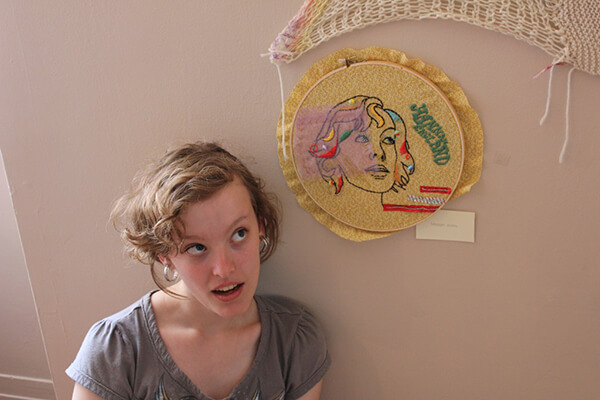
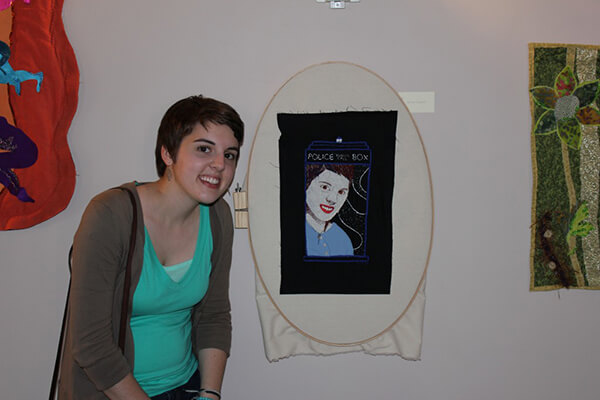
And just for fun, here are some pictures from my fiber arts class. We had some of our pieces featured in an exhibit downtown at the end of the semester.

My embroidery project – I did a crazy colorful portrait of my friend Hannah. maggies-embroidery
My friend Hannah’s project – she did a portrait of me (in a TARDIS). hannahs-embroidery
My quilt, inspired by my two favorite trees on campus. tree-quilt

And just a reminder,
If you have my blog bookmarked, be sure to change that bookmark to www.jalfrezi.com.

Posted in DIY | Tagged , , , , , , | 1 Response

DIY Headwrap

This weekend, my sister tossed a shirt because it was ripped in under the sleeve. The shirt used to be mine until I outgrew it, and it was really tough for me to give up because I love the colors and pattern so much. When she deemed that it was unwearable , I snatched to, knowing I could make something with it.

I decided it would make a nice spring scarf/headwrap. So here’s what I did. Not very complicated.
make-a-headwrap-diy

SUPPLIES:

old blouse (this one’s a very thin cotton, no stretch)

scissors

sewing machine & thread

INSTRUCTIONS:

1. Cut off all the bulky stuff – cuffs, collar, buttons. I ended up with about 5 rectangles: 1 from each sleeve and three from the body. Don’t worry about seams – you can see in my pictures that there are seams on my pieces of fabric. They won’t really be noticeable on the final product, particularly if you’re using a shirt with a fun pattern.

shirtscarf1

shirtscarf2

2. Cut all the rectangles so they are the same width (length doesn’t matter). Sew them together along their widths so you have a long strip of fabric like below. shirtscarf4

3. One you have the rectangles sewn together into a long strip, fold it in half lengthwise, right sides facing together, and sew together the edges to make a long tube. Also sew shut one end of the tube. I cut the ends at a slant to create more of a tapered shape. Turn your creation right side out. Fold the edges of the unfinished end inward and sew shut. I topstitched each short end of the headwrap just for added durability.

shirtscarf3

4. Wrap around your head and tie! Also makes a cute scarf. :) shirtscarf5

Posted in DIY | Tagged , , , , , , , , | 2 Responses

DIY Newspaper Necklace

I made a a necklace from newspaper a few years ago, and it’s one of my favorite pieces of jewelry I’ve created. It’s a bit time-consuming, especially if you attach them with wire like I did, but it’s such a versatile necklace – it matches everything! Check out the following instructions to make your own.
newspaper-necklace-diy

SUPPLIES:

newspaper-necklace-diy1

Mod Podge or other craft glue

paint brush (for glue)

newspaper (I used colorful pages – like comics)

eye pins (I didn’t have any, so I just cut the flat end off of head pins) or something to string the beads onto

jewelry pliers and wire cutter (not necessary if you are stringing the beads)

scissors

INSTRUCTIONS:

1. Cut newspaper into triangular strips. Different size strips will make different bead shapes. Just experiment with a few different sizes to see what you like best. I like the shape the longer strips create, so that’s what I used. The long ones below are about 10″ long and 3/4″ wide at the widest end.

newspaper-necklace-diy2

2. Paint the back side of the strip (the side you don’t want to see) with Mod Podge or glue of choice. Don’t put glue on the widest end of the strip. Start about 1/4″ down. If you cover the wide end in glue, it will be really difficult to roll up into a bead. newspaper-necklace-diy3

3. Start rolling at the wide end. I find it easiest to hold the strip between my fingers like in the pictures below and just keep wrapping the newspaper around. Roll tightly for the neatest-looking bead. It may take a few tries before you get the hang of it and make a pretty bead. You might try wrapping the newspaper around something like a skewer if you find my method to be difficult. Just be sure to take the beads off the skewer before the glue dries.
newspaper-necklace-diy4

4. Let the glue dry, then coat the outside in Mod Podge to waterproof the bead and make it more sturdy. Let dry completely. newspaper-necklace-diy5 newspaper-necklace-diy6

5. Once you’ve created all your beads, slip them onto eye pins and bend an eye hole onto the other end of the wire. You may need to trim the wire down some – it took a little less than 1/2″ of wire for me to create an eye hole. I actually made my own eye pins because I didn’t have any. You could also string your beads. It’d be much quicker and would still look nice. newspaper-necklace-diy7 newspaper-necklace-diy8

6. You’re done! Wear your necklace proudly. The beads would also make a cute bracelet or earrings. newspaper-necklace-diy9

Subscribe in another reader


Posted in DIY | Tagged , , , , , , , | 5 Responses

Recipe: Avocado Pie

Remember when I said I love avocados? Remember when I said (in that same post) that I love trying weird foods? Well it’s true. The day I discovered that avocados can be used in desserts, I had to try it. So I whipped up this avocado pie. When my mom got home, she looked in the fridge and saw the green pie. She asked me what I used to make it green, because the only green food we had in the house at the time was avocados. “If you put avocados in it, I’m not eating it,” she said. Now, many years later, it’s one of our favorite desserts.

It may sound weird, but trust me, it’s delicious. In Vietnam, there’s a beverage called sinh to bo, and it’s made with avocados, sugar, and milk. In Indonesia, they add chocolate or coffee and call it es apokat. In the Philippines, Brazil, Morocco, and India, avocados are traditionally eaten in sweet rather than savory dishes as well. In many countries, it’s mixed with other chopped fruits to make fruit salad.

avocado_pie

Avocados are a rich, buttery, creamy fruit, so it makes sense that they’d be great for desserts, right? Just forget about guacamole and California rolls for a while. If you like lemon- or lime-flavored desserts, you’ll enjoy this. It’s similar to key lime pie. Here’s the recipe for avocado pie:

Ingredients for filling:

1 large Hass avocado

1/4 cup lime juice

1 14oz can sweetened condensed milk

Ingredients for crust (you could buy a graham cracker crust, but homemade is so much better!):

1 cup graham cracker crumbs (If there are pecans in the house, I’ll do 1/2 cup graham cracker crumbs and 1/2 cup ground pecans – delicious!)

1/4 cup brown sugar (sometimes I reduce this or leave it out just to cut down the amount of sugar in the pie. I compensate with more graham cracker crumbs or ground pecans. The sugar does help hold the crust together, though, so if you choose to leave it out or use less, just expect a more crumbly crust.)

1/4 cup butter, melted

Steps:

  1. Preheat oven to 360˚F.
  2. Grind graham crackers (and pecans if you want) in a food processor. Mix the crumbs, brown sugar, and melted butter in a small bowl.
  3. Pour your crust mixture into a pie plate. Press the mixture to the bottom and sides of the plate.
  4. Bake the crust for 10 minutes. It will bubble and the sides will probably melt down a little bit, especially if you choose not to use the sugar.
  5. While the crust cools, scoop the avocado meat into a blender. Add the lime juice and blend until smooth.
  6. Add the condensed milk to the blender and blend again until your mixture is a consistent pale green.
  7. Pour the avocado mixture into the crust. Spread it evenly.
  8. Refrigerate the pie for three+ hours – it’s best after it has had time to chill and get a bit firm. Or if you’re impatient like I sometimes am, pull it out after half an hour. :)
  9. Serve with a generous scoop of vanilla ice cream or whipped cream…or both!

(I didn’t have ice cream OR whipped cream. Sad! But it was still delicious.)
avocado_pie2


Posted in DIY | Tagged , , , , , | 2 Responses

DIY Valentine Mobile

I was feeling crafty over the weekend, so I gathered some supplies and made this little Valentine decoration. I actually intended to write a quote about friendship on it, stick it in an envelope, and mail it to a friend…but I decided to just keep it as a decoration.

Heres’ how you can make your own!

valentine1 valentine2

SUPPLIES:

pink and/or red felt

pink or red yarn or string

pretty patterned scrapbooking paper

quilting needle

scissors

craft glue

clear tape

INSTRUCTIONS:

1. Cut 13 squares of felt. Mine are about 1.5″ x 1.5″, but you can make them bigger or smaller depending on how big you want your hearts to be. You could also cut a different number of hearts, depending on how long or wide you want your mobile to be. 13 will get you 3 rows of 3 and 2 rows of 2.

valentine4

2. Fold each square in half to cut it into the shape of a heart (you know, like your mom or teacher taught you in elementary school). valentine5

3. Arrange your hearts how you want them to hang. Make sure you have the spacing how you want it, too. valentine6

4. Cut a piece of string or yarn for each row of hearts. My lengths of yarn were long enough to space the hearts the way they are laid out in the picture above, plus three extra inches above and below the rows. valentine8

5. Prick 2 holes in each heart to thread the yarn through. I used a quilting needle to poke a hole, then I stretched the hole with the tip of my scissors. valentine7

6. Use the quilting needle to press the string/yarn through the holes in the hearts. valentine9

7. Once all your hearts are strung, they should look something like this: valentine10

8. Cut 2 strips of craft paper – one for the top of the mobile and one for the bottom. Mine are 3″ x 9″. Fold each strip in half lengthwise. valentine11

9. Mark in pencil where you want to glue each string. Use a dab of craft glue to glue each strand in place. Apply some glue to the other half of the paper, then fold and glue down. Do the same thing to the other end of your mobile. valentine12 valentine13

10. Beaaauuutiful! Hang it in a place of honor (take a length of string and tape each end of string to either end of the top paper strip), or write a note across the top piece of paper, carefully place in an envelope, and mail to a friend. valentine3


Posted in DIY | Tagged , , , , , , , | 2 Responses

DIY Necklace Holder

For years, I’ve had all of my necklaces separated by color into a little set of drawers. I rarely wore them because I didn’t really think about it. I decided that in order for me to wear them, I actually needed to see them so I would remember they exist. I came across this tutorial for a necklace holder and I knew that was the solution.

The tutorial there is great, so I’m not going to repeat it here. I will share pictures of my finished product, though, as well as some tips based on my experience making it.

A little about my supplies. I really wanted to find some vintage knobs, but the local antique store didn’t have any, and shipping charges would have made ordering some from somewhere like Etsy cost more than I really wanted to put into this project. I ended up going to Hobby Lobby with a 40% off coupon. They have a huge selection, many of which are vintage-looking, and most of them are around $3-4 (before discount). My dad pulled the wood out of a creek for me. We live in an old mill town, so the wood is actually an old floorboard from one of the mill buildings.

necklacerack1 necklacerack2

The part of this project that may cause the most questions or confusion is attaching the knobs. If I had just drilled holes in the wood and attached the knobs as I bought them, extra screw length, washer, and nut sticking out on the back would have prevented me from hanging the slab of wood flat against the wall. The girl who wrote the tutorial…well, here’s what she said in a comment, “I used the knobs with the screw head on the back so it was flush with the wood. The knobs screwed in from the back to the front (into the knob) so I didn’t have to cut off the extra metal.” If the knobs you use are made like hers, then great. Mine were not, however.

In order to attach mine, I didn’t use the washers and nuts that came with them. First, I measured the thickness of the wood to determine the length the screws needed to be. I (my dad, actually) put the knob in a vice to hold it securely while sawing, and used a hacksaw to cut the screw to the needed length (please only do this if you have experience using a hacksaw. Find someone with experience to guide you or do it for you if you’ve never used one).
necklacerack3 Once they’re the right length, just screw them into the holes you drilled in the wood. As long as you’re not hanging ship anchors on them, they should be secure enough.

I love my new necklace holder (above) and I have indeed been wearing my necklaces more often. Below are a few more pictures of this same project done by others (each linked to original source).

via Selective Potential

via A Beautiful Mess

via Etsy

via Visibly Moved (original tutorial)

via Art Actually

Posted in DIY | Tagged , , , , , , , , , | 6 Responses

DIY Suede Bow Belt

I saw a bow belt similar to this once, and I’ve been resolved to make one ever since. I really like the way it turned out, and I think it may be one of my favorite DIYs to date. Here’s how you can make your own!

bowbelttitle

SUPPLIES:

strip of suede 1 1/2″ wide x 8″ long

strip of suede 1 1/4″ wide x measurement of your waist plus 2 inches long

strip of suede 1/4″ wide x 12″ long (you’re going to cut off most of this length so it doesn’t have to be exact. It’s just nice to have room to work with)

note: I bought a 1 1/2″ x 42″ strip of suede at Hobby Lobby and it was enough to create all the strips above. I didn’t have any room for error, though, as it was JUST enough.)

exacto/utility knife

sharp scissors

snaps + attacher (find at a craft or sewing store…or yard sale)

tacky glue

velcro

INSTRUCTIONS:

1. Cut your suede into the strip sizes listed above. Be sure to carefully measure your waist (don’t pull the tape measure to tight unless you want the belt to suffocate you). The piece of suede that wraps around your waist should be 2 inches longer than your measurement so you’ll be able to overlap and snap it.
bowbelt1

2. Cut a slit on one end of the long strip (the piece that goes around your waist) with an exact/utility knife. Be careful! The suede is thick and it may be difficult. I just went over the same spot with the knife several times until it cut all the way through. The slit should be large enough so both ends of you skinny strip of suede will fit through it. Pull both ends of the skinny strip of suede through the hole creating a loop (see image below). bowbelt2 bowbelt3

3. Grab your 8 inch piece of suede. This will be the bow. Pinch it in half at the center. Now pinch the edges back upward creating an accordion fold (see image below). bowbelt4 bowbelt5

4. Dap a bit of tacky glue between the folds if you want to be extra sure the shape holds. While holding the folds you created to keep it from coming apart, slip the bow through the loop you created in step 2 and pull the loose ends of the loop to tighten it around the bow. Once that loop is pulled tight, your folds should hold securely. bowbelt6 bowbelt7

5. taper the edges of the strip you’re making the bow with. Dab some glue on the tapered ends. Fold them under and glue them to the belt strip. You now have a pretty little bow! bowbelt8 bowbelt9 bowbelt10 bowbelt11

6. Now comes the kinda tricky part – attaching the snap. If you get a tool like this, it should have instructions with it on how to attach snaps, and that’s really gong to do a better job explaining it than I could here. It requires a little muscle to get the tool to punch through the thick suede. Make sure the pieces of the snap that attach into one another are facing the correct direction when you attach them. So on the bow end, the snappy part should face INWARD and on the other end, the snappy part should be facing OUTWARD. See below pictures to see where I placed the snaps. bowbelt12 bowbelt13 bowbelt14 bowbelt15 bowbelt16

7. Trim the loose ends of the suede strip that you made the loop with and glue them down. I used paperclips to hold them in place until the glue dried.

bowbelt17

8. Lastly, since the snap is little far back on the bow end, I added some velcro to hold the bow down when I wear it. These velcro strips already had adhesive on them, but tacky glue would work, too. This is actually really strong velcro, so I probably could have just used it instead of the snap. So if you don’t feel like attempting the snaps, you could easily just use some strong velcro.

bowbelt18

Enjoy your new belt! I really love it and I can’t wait to wear it! Please let me know if you have any questions of if anything needs some clarification. :)

Posted in DIY | Tagged , , , , , , , | 2 Responses

DIY Polymer Clay Curved Tube Necklace

I have a huge box of polymer clay and supplies, but I rarely get into it and make things anymore. This week I decided to pull it out. Here’s what I made and instructions on how you can make your own! I was feeling inspired after my post about the color of the year yesterday, so I went with an emerald color (a little closer to teal…but good enough). Like this DIY? Pin it on Pinterest to share it with your friends! Just click the Pinterest button at the bottom of the post. And remember…that button is on ALL of my posts, so pin away! :)

claynecklace1

SUPPLIES:

2 colors of polymer clay (Fimo or Sculpey are good. You can find them at a craft stores.)

Metal skewer (or other metal rod about the same thickness)

Something to cut the clay with (I have a blade like this one but an Exacto knife or something similar would work fine)

Rolling pin

Paintbrush

Glossy Mod Podge

Optional: Pearl Ex pigment

INSTRUCTIONS:

1. Massage the clay in your hands until it’s soft enough to work with. For the color that you want less of, use a ball about 3/4″ in diameter. The other color should be about 1 3/4″ in diameter. See the picture below for clarity. The squares on the cutting mat are 1 square inch each.

claynecklace2

2. Roll each ball of clay between your hands until it’s slightly oblong (oval). Roll them out with a rolling pin. Roll from tip to tip of the oval, if that makes since. You want to make the shape longer. Once the clay is pretty thin (around 2mm), cut off the edges so you have a clean rectangle. Gently press the two rectangles together (see below). Use your finger to carefully smudge the crease to hold the two rectangles together, but don’t go overboard or you’ll destroy that nice straight line. The two rectangles will adhere securely in a later step when you roll it out some more.

claynecklace4

3. place the skewer on one of the long sides of your clay. carefully wrap the skewer with the clay. Cut off the extra. The edges should overlap just slightly.

claynecklace5 claynecklace6

4. Use the palm of your hand to gently roll the clay wrapped skewer on a clean surface (if your skewer has a handle at one end, it might make rolling it a bit difficult, but mine had a handle and I still managed). This will flatten out the bulk where the two edges overlap and start to blend them. Use your finger to smudge the clay to get rid of the seam.

claynecklace6b

5. One the seam is gone, roll the clay wrapped skewer under your palm some more to make the shape clean and consistent and to get rid of finger prints.

claynecklace7

6. Use your cutting tool to cut off the uneven edges. You’ll kinda have to work your way around the skewer carefully since you can’t cut through the skewer. I did this while it was still on the skewer so I wouldn’t squish the opening with the blade.

claynecklace8

7. This step is optional. I found this metallic pigment powder from another clay project I did a few years ago and I though it would add a nice touch. I think I bought this at a craft store (Hobby Lobby?). Use a paintbrush to apply the pigment. Using a fine-tip paintbrush will allow you to create clean lines. I put a thin line over the seam where the colors meet and then I coated one end of the shape. If you aren’t careful with this stuff, it’ll stick all over your project.

claynecklace9 claynecklace10

8. Bend the shape to create a smile. :) Place it on a cookie sheet and bake it at 275˚F for 30 minutes.

claynecklace11

9. Once it cools, apply Mod Podge. The reason for doing this is because that metallic pigment will still rub off some even after your project is baked. The Mod Podge will seal it on. If you like the matte look of the clay, you can JUST cover the metallic parts with Mod Podge or you can use matte Mod Podge. If you don’t use the metallic pigment, this step is optional.

claynecklace12

10. Thread a chain through the opening and wear your lovely new necklace! I tried both a short chain (below) and a long chain (top of post). Both have a pretty different look, so hopefully my pictures here will help you figure out which chain length you prefer. I think I like it long.

claynecklace13

Posted in DIY | Tagged , , , , , , , | 5 Responses

Recipe: Chocolate-Covered Hazelnuts

The holidays have slowed my posting down some and I have a grad school application due on Monday, but I should be back to normal posting by next week.

In the mean time, here’s a kinda random something for you. When my cousin was visiting before Christmas, she was snacking on some chocolate-covered hazelnuts her sister made. (They’re from Oregon, where 99% of U.S. grown hazelnuts come from…you lucky Oregonians!) She gave me a few and they were delicious, so I decided to make my own. Here’s the recipe. You could really use this to make chocolate-covered anything if you don’t like hazelnuts. I had some leftover chocolate, so I actually covered some pretzels, too. Enjoy!

INGREDIENTS:

4 oz semi-sweet chocolate (I used a Sun Spire fair trade organic baking bar)

~1 cup hazelnuts (I didn’t measure…it may have been a little less than a cup. But I had plenty of extra chocolate.)

dash of salt (optional)

a few (3-4) drops of liquid stevia (optional)

STEP 1: Roast the hazelnuts in the oven at 400˚F for about 3-5 minutes. I didn’t really time this, but I know it was no more than 5 minutes. I just kept an eye on them to make sure they weren’t burning. I pulled them out when I started to hear a little bit of crackling. While still warm, put them in a dish towel and rub them around to get the skins off. Use your fingers to rub off whatever skin still remains. It should come off easily. As you can see in my pictures, I couldn’t get all the skin off, but it doesn’t really matter.

hazelnuts1

hazelnuts2

STEP 2: Break up your chocolate and put it in a bowl (if you’re using chocolate chips, no breaking necessary :D ). Microwave it about 15 seconds at a time. Stir between each microwaving. Do this until the chocolate is completely melted. You could use a double broiler to melt the chocolate, but…microwaving is quicker. Once melted, you can add a dash of salt and a few drops of stevia just to enhance the taste if you want.

hazelnuts3

STEP 3: Add the hazelnuts to the chocolate and stir them around until completely coated.

hazelnuts4

STEP 4: use a fork to place the coated hazelnuts on parchment paper on a cookie sheet.

hazelnuts5

STEP 5: Refrigerate the hazelnuts until the chocolate has hardened. Enjoy! Yummy yummy!

hazelnuts6

Posted in DIY | Tagged , , | 4 Responses

DIY Doctor Who (or just cool outer space) Tote

I made this tote as a Christmas gift for a cousin who likes Doctor Who, but I really like how it turned out and wish I had one for myself! Even without the TARDIS, it would still be a really cool outer space image. Or you could even put something random floating around in space instead of the TARDIS…like a cow, perhaps (haha). Here’s what I did. I made it all up as I went along, so I’m happy it worked out so well.

SUPPLIES:

canvas tote bag (find at a craft store)

acrylic paints in blues, purples, black, and white

paint brush(es)

cardboard the size of the bag (to slip inside it while working)

(optional) TARDIS or other stamp

STEPS:

1. Wet the area of the tote bag that you plan to paint. I just used a paint brush to dab the water on. Slip a piece of cardboard in the bag so the paint won’t seep through onto the other side of the tote.

drwho1

2. Get a cup of water and prepare your different paint colors. I used a dark and light blue, a dark and light purple, and black. using a wet paintbrush, dab paint all over the bag (the wet area). Using a different paintbrush, dab water all over the paint you apply. The water thins out the paint so you can spread it around and give it that cloudy, galaxy-like look. Just keep applying paint and water (I used a lot of water) until you like how it looks. Keep in mind it will be lighter when it dries – all that water is making the fabric look a lot darker than it is.

drwho2

drwho3

drwho4
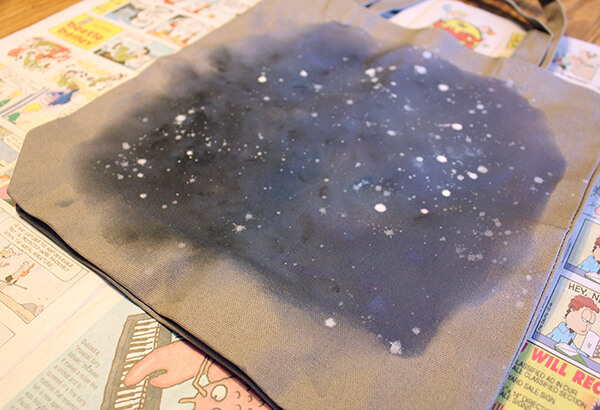
3. When the tote is dry, take it outside (this step is messy). Water down some white paint and do some splattering. Just dip a paintbrush in the white paints and flick it over the tote. Do this until you have a lovely, star-filled galaxy.

drwho5

drwho6

4. This step is optional…you can just leave the awesome space image as is if you like it that way or don’t care about Doctor Who (gasp!). I had this TARDIS carving I did for a letterpress class, so I used that. You can probably freestyle the simple TARDIS shape if you trust your painting skills. Another option would be to get a linoleum block and carving supplies and make your own stamp (really not worth the effort…if you can carve, you could probably just freestyle the picture directly onto the bag a lot more easily). Put paint on the stamp and press it onto the bag. This just left a light coating of paint when I did it, but it provided a nice guide…I just went back over it freestyle to make the image darker and more clear.

drwho7-1

5. This step is also optional. Since I watered down the white paint for the stars, once it dried it was pretty faint. I went back over some of the stars with white paint (NOT watered down) to brighten them up. This also gives more dimension to the image – the brighter stars appear closer.

drwho7

6. Enjoy your new tote (or give it as a gift like I’m doing)!

drwho8
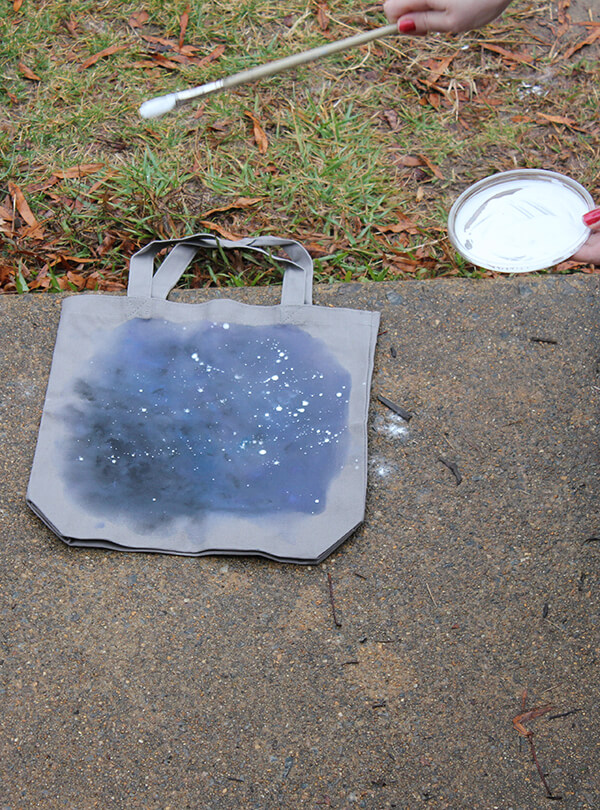
If you have any questions, please ask in the comments! I’ll be happy to answer!

Posted in DIY | Tagged , , , , , , , , , | 2 Responses

  • Hey! I'm Maggie, a graphic designer, crafter, devoted secondhand shopper, Doctor Who fanatic, and dog-lover. Stick around and explore!


  • Enter your email address to receive notifications of new posts by email.